
Friday, December 12, 2014
Final set up and Sample video
Physical set up and arduino codes
We get the physical setup for the etch a sketch and run some sample code of drawing rectangle and diamond. The prototype setup is quite simple. Check out the final set up as well as the sample video in our next post


 Here is the code:
Rectangle:
#include <AccelStepper.h>
#include <Wire.h>
#include <Adafruit_MotorShield.h>
#include "utility/Adafruit_PWMServoDriver.h"
Adafruit_MotorShield AFMS = Adafruit_MotorShield();
// Connect two steppers with 200 steps per revolution (1.8 degree)
// to the top shield
Adafruit_StepperMotor *myStepper1 = AFMS.getStepper(200, 1);
Adafruit_StepperMotor *myStepper2 = AFMS.getStepper(200, 2);
// you can change these to DOUBLE or INTERLEAVE or MICROSTEP!
// wrappers for the first motor!
// FORWARD->clockwise, BACKWARD->counterclockwise
// step(#steps, orientation, step mode)
void setup(){
Serial.begin(9600);
AFMS.begin();
myStepper1->setSpeed(50);
myStepper2->setSpeed(50);
}
void loop() {
myStepper1->step(200, FORWARD, SINGLE);
myStepper2->step(200, FORWARD, SINGLE);
myStepper1->step(200, BACKWARD, SINGLE);
myStepper2->step(200, BACKWARD, SINGLE);
}
Diamond:
#include <AccelStepper.h>
#include <Wire.h>
#include <Adafruit_MotorShield.h>
#include "utility/Adafruit_PWMServoDriver.h"
Adafruit_MotorShield AFMS = Adafruit_MotorShield();
// Connect two steppers with 200 steps per revolution (1.8 degree)
// to the top shield
Adafruit_StepperMotor *myStepper1 = AFMS.getStepper(200, 1);
Adafruit_StepperMotor *myStepper2 = AFMS.getStepper(200, 2);
void forwardstep1() {
myStepper1->onestep(FORWARD, SINGLE);
}
void backwardstep1() {
myStepper1->onestep(BACKWARD, SINGLE);
}
// wrappers for the second motor!
void forwardstep2() {
myStepper2->onestep(FORWARD, SINGLE);
}
void backwardstep2() {
myStepper2->onestep(BACKWARD, SINGLE);
}
AccelStepper stepper1(forwardstep1, backwardstep1);
AccelStepper stepper2(forwardstep2, backwardstep2);
void setup()
{
AFMS.begin();
stepper1.setMaxSpeed(200.0);
stepper1.setAcceleration(100.0);
stepper1.moveTo(800);
stepper2.setMaxSpeed(200.0);
stepper2.setAcceleration(100.0);
stepper2.moveTo(800);
}
void loop()
{
if(stepper1.distanceToGo() == 400)
stepper1.moveTo(-stepper1.currentPosition());
if(stepper2.distanceToGo() == 0)
stepper2.moveTo(-stepper2.currentPosition());
stepper1.run();
stepper2.run();
}
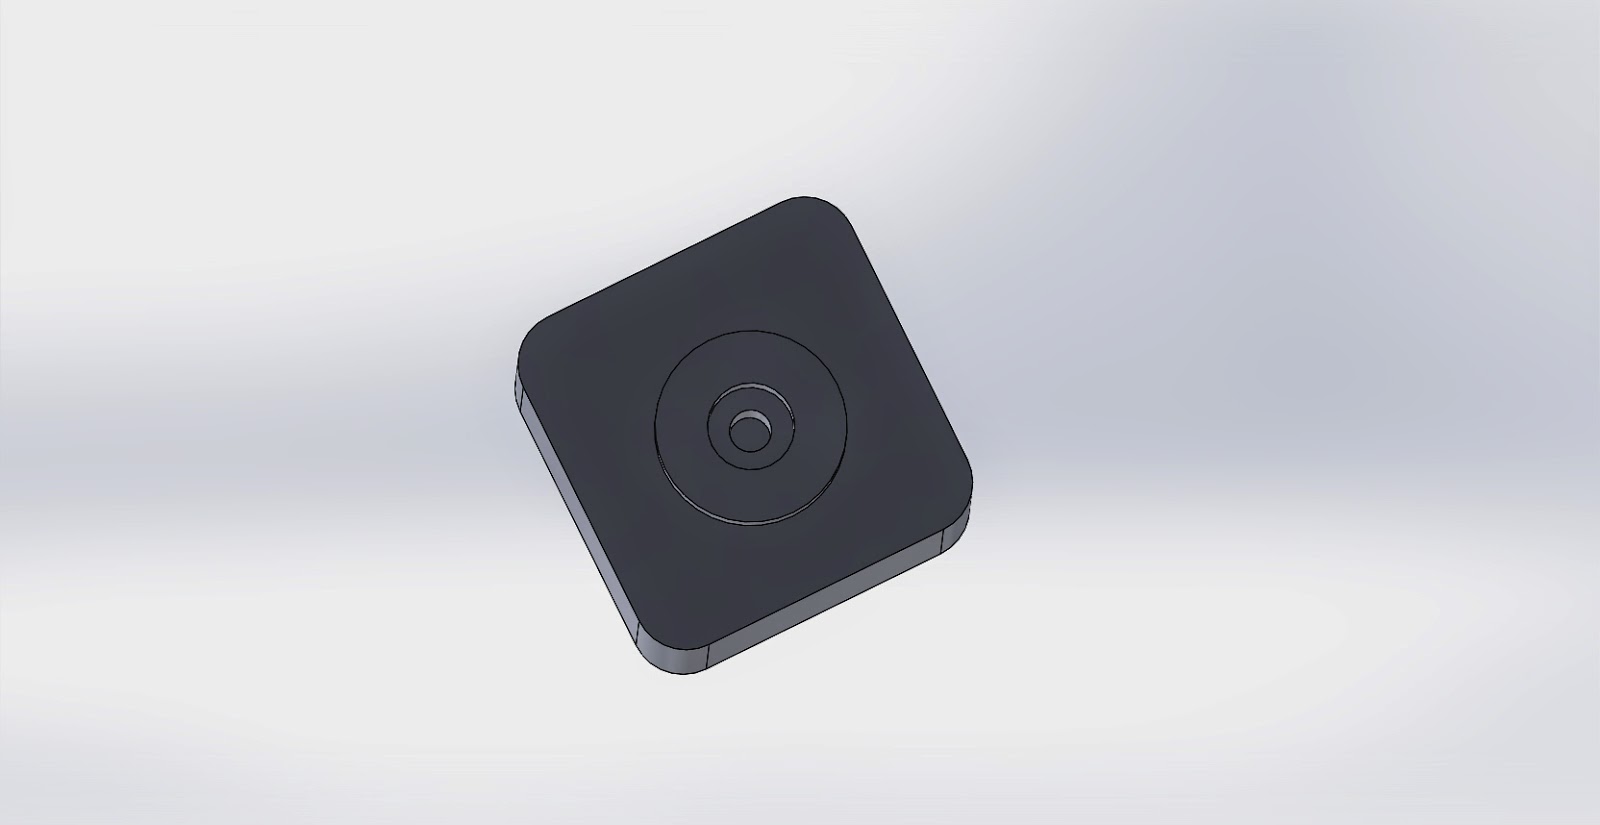
Solidworks parts in detail
We finished the Solidworks parts today and got a quick physical set up that provides us a complete look of what the project is going to be. These are the Solidworks parts
Etch a sketch

https://drive.google.com/open?id=0B0xJKiTfpJYsNHhOelJlWHc0Njg&authuser=0
Knob Gears will be laser cut

https://drive.google.com/open?id=0B0xJKiTfpJYsR0ExQWVxNTlZZnc&authuser=0
Stepper Motors axle

https://drive.google.com/open?id=0B0xJKiTfpJYsVXpWWXJvNkUyblk&authuser=0
Stepper Motors body
https://drive.google.com/open?id=0B0xJKiTfpJYseW1vcGNqQU1DTlU&authuser=0
Stepper Motors Gears will be laser cut

https://drive.google.com/open?id=0B0xJKiTfpJYsOFplTTZTZnVKc3M&authuser=0
Final Assembly, we connect those gears to the etch a sketch and the stepper motor

https://drive.google.com/open?id=0B0xJKiTfpJYsVUJNdFo1aWpUcVk&authuser=0
Etch a sketch
https://drive.google.com/open?id=0B0xJKiTfpJYsNHhOelJlWHc0Njg&authuser=0
Knob Gears will be laser cut
https://drive.google.com/open?id=0B0xJKiTfpJYsR0ExQWVxNTlZZnc&authuser=0
Stepper Motors axle
https://drive.google.com/open?id=0B0xJKiTfpJYsVXpWWXJvNkUyblk&authuser=0
Stepper Motors body
https://drive.google.com/open?id=0B0xJKiTfpJYseW1vcGNqQU1DTlU&authuser=0
Stepper Motors Gears will be laser cut
https://drive.google.com/open?id=0B0xJKiTfpJYsOFplTTZTZnVKc3M&authuser=0
Final Assembly, we connect those gears to the etch a sketch and the stepper motor
https://drive.google.com/open?id=0B0xJKiTfpJYsVUJNdFo1aWpUcVk&authuser=0
Last meeting
We finally get the physical set up today. We start running the codes and testing the whole system. We were able to control the Etch a Sketch by using two stepper motors to draw square and rectangle. But the toughest part is to write the code for drawing diamond shape. Working until late last night, we had some progress for the diamond shape code but we need more time to get it done. Here is the sample video showing how the Etch a Sketch works with stepper motors and arduino.
Monday, December 8, 2014
Final Week meeting
Here was what we did last week. We met three time last week and started the codes needed to control the stepper motors. We have been done some generic codes but we will need to work a lot on the code in order to control the steppers motors to do what we want. Our plans are to control the Etch A Sketch by using two stepper motors to draw rectangle, triangle or square. Draw the circle is the hardest part, we will work on it if we have time. We are trying to complete the Solidworks assembly part and the mechanic part for our project by Tuesday 12/9/2014.
This week 12/8-12/11, we will meet every and put our best effort on the project.
This week 12/8-12/11, we will meet every and put our best effort on the project.
Saturday, November 15, 2014
Meeting 2
11/15/14
Team Meeting @ University Crossing 1PM
All members were in attendance.
Team Name: R2 Doweknow?
During the meeting we further discussed our project ideas. We've decided that we wish to program our Arduino to physically draw on a piece of paper. As of now, we understand that at least one or more stepper motors will be required, most likely potentiometer(s), and lever arms to hold a drawing utensil will need to be created by printing and cutting or by utilizing make-shift parts. After searching the web, we came across these two websites that relate to our project idea:
1. http://makezine.com/projects/circle-a-sketch/
2. https://www.marginallyclever.com/blog/2013/08/how-to-build-an-2-axis-arduino-cnc-gcode-interpreter/
Things to do next week:
-start to physically experiment with the arduino in context to our research and project idea
-ask Prof. Sullivan about stepper motor availability
-
Things to clarify:
-project specifications
-due date
Next meeting: Wednesday November 19, 2014 @ 4PM in Lydon or Ucrossing
Tuesday, November 4, 2014
Project discussion
Subscribe to:
Comments (Atom)